Getting Started with Your eSIM
A simple step-by-step guide to install, activate, and troubleshoot your eSIM.
Quick Fix Checklist (Try This First)
Turn ON Data Roaming (this is required)
Set eSIM as Mobile Data line
Restart your phone
Turn OFF VPN
Wait up to 10 minutes for first connection
Before You Start (Critical Checks)
Your device supports eSIM
Your device is carrier unlocked
You have a stable internet connection (WiFi recommended)
You are installing the eSIM on the device you will use it on
Each eSIM can only be installed on one device. Do not scan the QR code on multiple devices. Do not delete your eSIM after activation unless necessary.
Installing Your eSIM
Option A — 1-Click Install (Recommended)
Available from your eSIM Profile page. Tap the “1-Click Install” button and follow prompts to add the mobile plan.
1-Click Install on iPhone
Tap the “1-Click Install” button on your iPhone and follow prompts to add the mobile plan.
1-Click Install on Android
Tap the “1-Click Install” button on your Android device and follow prompts to add the mobile plan.

Option B — QR Code Install
Open your phone camera, scan the QR code provided, then tap 'Add eSIM / Add Mobile Plan'.
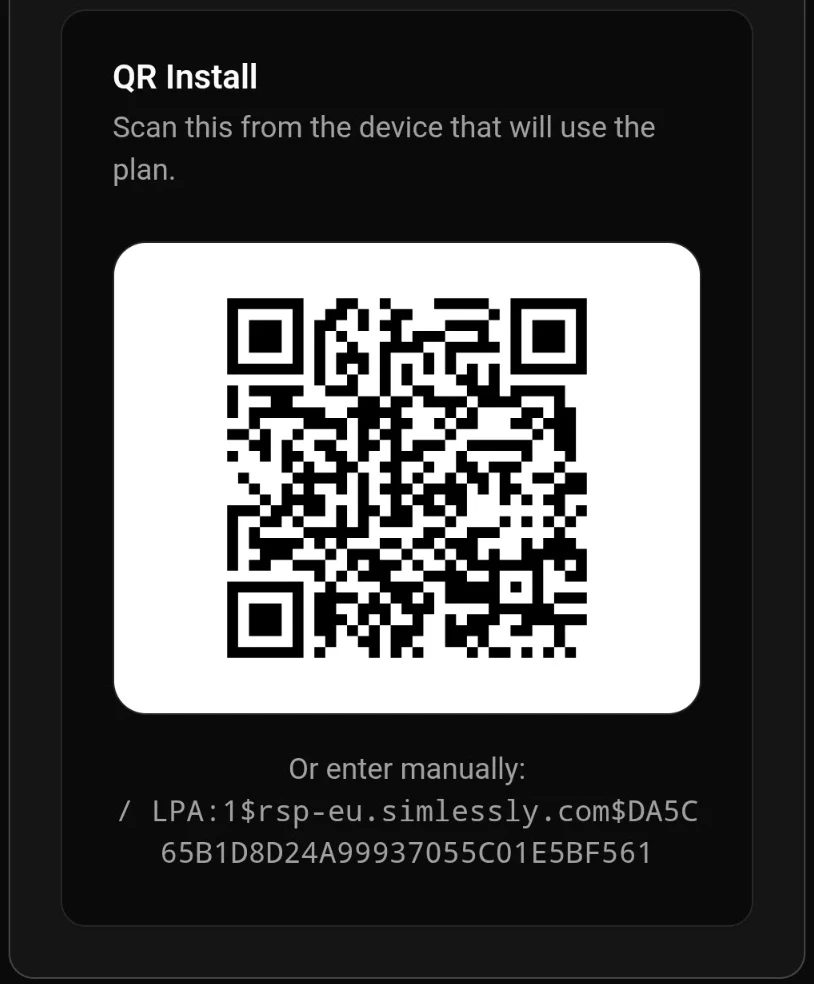
Option C — Manual Install
Use this only if QR or 1-click doesn’t work. iPhone: Settings → Cellular → Add eSIM. Android: Settings → Network → SIM → Add eSIM. Enter the Activation Code (LPA format) when prompted.

After Installation (IMPORTANT)
Select eSIM for Mobile Data
Turn ON Data Roaming (REQUIRED)
Turn OFF Primary SIM Roaming
⚠️ If you skip this step, your eSIM will NOT work. Follow the checklist exactly after installation.
DO NOT DO THIS
Do NOT delete your eSIM after activation
Do NOT scan the QR on another device
Do NOT turn on roaming for your home SIM
These actions can cause irrecoverable activation problems and may lead to refund requests.
Device-specific Instructions
Always start with 1-Click Install (recommended). To view Activation Details open the eSIM Profile and click 'Show Activation Details'.
iPhone
Follow these steps:
Android
Start with 1-Click Install from your eSIM Profile. Settings paths vary by vendor; examples below help if your phone menus differ.
What's Your Issue?
Try: restart, manual network selection, check coverage
Try: ensure eSIM is selected for Mobile Data, toggle Data Roaming, check APN
Try: 1-Click Install, then QR, then Manual. Ensure device unlocked and internet available
Try: test in a different location, confirm carrier coverage, consider FUP limitations
First Connection Delay
⏳ First connection can take up to 10–60 minutes. This is normal — wait before opening a support ticket.
Plan Start Warning
⚠️ Your plan may start immediately after installation for some plans. Check plan details before installing if timing matters.
Activation Details Link
Find your APN / Activation Code on your eSIM Profile page: visit your eSIM Profile and click 'Show Activation Details'.
When Does Your Plan Start?
Most plans start on first connection to a network
Some plans start immediately after installation
Check your plan details carefully
Using Your eSIM
Your eSIM is data-only — no calls or SMS (unless stated)
You can use apps like WhatsApp, FaceTime, etc.
You can use hotspot/tethering if supported
Understanding Your Data Plan
Fixed data plans: e.g. 3GB over 30 days — once data is used service may stop or slow. Unlimited/daily plans: high-speed data per day then reduced speeds under Fair Use Policy. Typical reduced speeds: 128 Kbps – 2 Mbps depending on network. Daily data resets every ~24 hours (varies by carrier).
Common Issues & Fixes
Toggle Airplane Mode ON (wait ~30s) → OFF. Then toggle the eSIM OFF → ON. This resolves many edge-case activation/connectivity issues.
Make sure eSIM is selected for mobile data, Data Roaming is ON, restart phone, toggle eSIM OFF → ON, turn OFF VPN, wait (first connection can take up to 1 hour), manually select a network if needed.
Restart device, ensure you're in supported coverage area, try manual network selection.
Try the 1-Click Install first (from your eSIM Profile), then scan the QR code, and only use Manual Install if those fail. Also check the device is unlocked, supports eSIM, has a strong internet connection, and the QR code hasn’t already been used.
Turn Airplane mode ON → OFF, re-enable eSIM, check APN settings (rare).
Most devices auto-configure APN. Only change if instructed. You can confirm the correct APN is set via the Activation screen on SuperiorMe by clicking 'Show Activation Details'. Example (Japan only): APN: vmobile.jp
Try reinstalling using the same Method as Initially Installed. QR code — reinstall may not always work after activation; a new eSIM may be required.
eSIMs cannot be transferred after activation — install on the correct device initially.
Reinstalling Your eSIM
You may be able to reinstall if it was deleted and you still have the original QR code. Limitations: can only be active on one device at a time and reinstall is not guaranteed after activation.
Important Usage Tips
Turn OFF VPNs when connecting
Label your eSIM (helps if using multiple)
Keep your QR code saved until trip ends
Install before travel if required by plan
Refunds & Activation Policy (Important)
Refunds only available if eSIM not installed or used and requested within 60 days
Once an eSIM is installed, scanned, or connected, it is considered used and cannot be refunded
Need Help?
If you've followed all steps and still have issues, contact support at hello@superiorme.com.au and include device model, country/location, screenshot of issue and steps already tried.
Glossary
Digital SIM built into your phone
Network settings required for internet
Connecting to networks outside your home country
Fair Use Policy — speed reduction after high usage